Page 7 of 9

Enabling DPD on VPN instead of tunnel_test on R77 gateway

To keep VPN tunnels alive Check Point uses by default it’s proprietary tunnel_test protocol. In order to get it working with 3rd party vendors it isn’t enough to have the partner device set as an “Interoperable device” and set the tunnel keep alive method on your gateway object as DPD. You also need to set the peer gateway’s tunnel keep alive method as DPD, because by default it is still set to tunnel_test.

To change the keep alive methods you need to do the following as described on Check Point’s website here:

  1. In GuiDBedit, go to Network Objects > network_objects > <gateway> > VPN > tunnel_keepalive_method.
  2. For the Value, select a permanent tunnel mode.
  3. Save.
  4. Install policy on the gateways.

ConfigSync issue upon resource pool member IP address change

Well as it turn’s out changing a node’s IP address in clustered environments doesn’t go that smoothly as one would expect. Not only that, F5 have made a annoyingly complex procedure of something that simple as changing one back end servers IP address. What I mean by that is, that in order to change the IP address of a node you actually have to delete the node and then re-create it. But when you have one node running a ton of services on different ports and is a part of a large amount of resource pools, etc you have to remove it from all of the resource pools before you can delete it. And then after creating the node again you have have to put it back in the pools you need it to be in.

As it turns out in a clustered environment when you do the aforementioned procedure and then try to sync the cluster member settings manually it will fail with an error message saying something like this:

0107003c:3: Invalid pool member modification. An IP address change from (192.168.1.1) to (192.168.1.2) is not supported.

So in order to avoid that error you need to sync the devices after you have finished all the deletion steps of the node and after you have done the config sync you may proceed with the creation of the node on the new IP address.

If you are already in the state where it is refusing to sync, well what helps is deleting the troublesome node on the secondary device also and then performing the config sync.

Check Point IPS signature updates through URL filtering blade with HTTPS inspection enabled

According to Check Point’s documentation you should let your SMS and Smart Dashboard clients get access to the internet freely without actually intercepting the traffic it self. There might be some cases where you wouldn’t like that idea too much and might still want to inspect it to restrict HTTPS connectivity of those hosts. After a bit of messing about, I managed to get IPS signature update through URL filtering working.

Basically when you try and update IPS signatures or have your Smart Dashboard try and connect to Check Point via URL filtering it will fail with errors relating to the certificates. In other words if you have followed the regular Check Point guidelines on setting up “App control/URL filter” and set the system to trust your gateway’s Certificate Authority, it will still fail. The reason behind it being the fact that Smart Dashboard client uses it’s own trust list not the system wide certificate store. The trust list file is located in “C:\Program Files (x86)\CheckPoint\SmartConsole\R77.30\PROGRAM\ca-bundle.crt” and when you add your own gateway’s CA certificate there after you have already started Smart Dashboard it will work until you restart Smart Dashboard. As I found out that file is actually being downloaded off the SMS every time Smart Dashboard starts up.

Fortunately the filename on the SMS is actually the same as it is in the SmartDashboard folder so when running the standard linux find command you see that there are quite a few instances of it:

/opt/CPsuite-R77/fw1/bin/ca-bundle.crt
/opt/CPinfo-10/bin/data/ca-bundle.crt
/opt/CPcvpn-R77/var/ssl/ca-bundle.crt
/opt/CPcvpn-R77/template/var/ssl/ca-bundle.crt
/opt/CPshrd-R77/database/downloads/CA_BUNDLE/1.0/1.0/ca-bundle.crt
/var/opt/CPsuite-R77/fw1/conf/SMC_Files/asm/ca-bundle.crt
/var/opt/CPshrd-R77/conf/ca-bundle.crt

Now make a backup of /var/opt/CPsuite-R77/fw1/conf/SMC_Files/asm/ca-bundle.crt and /var/opt/CPshrd-R77/conf/ca-bundle.crt files and your gateway’s CA certificate in PEM format to the end. After doing that restart Smart Dashboard and check if the ca-bundle file has your CA certificate in it and if communication to Check Point actually works.

Just as a reminder, the URL’s that need to be enabled for IPS signature to work can be found on CP support site here: https://supportcenter.checkpoint.com/supportcenter/portal?eventSubmit_doGoviewsolutiondetails=&solutionid=sk112635

CheckPoint VPN with failed connection not showing up in SmartView Tracker

Scenario description

You might have an old existing VPN with some partner which to a gateway that is not under your control. That peer gateway used to be also a CheckPoint device but get’s exchanged for some other 3rd party vendor firewall with out prior notification. When the peer gateway gets changed, the key exchange seems to work, but connection’s fail and nothing seems to be showing up in SmartView tracker although connection logging is on.

Finding out what is happening and trying to fix it

After seeing no traffic in SmartView tracker, you log in to the gateway and might look at tcpdump to see if there is actually any traffic coming from the peer gateway. After seeing there is actual traffic coming you should try a few kernel level debug commands on VPN to get some info on whats happening. For example run “fw ctl zdebug -m VPN all” and you might see something like this in the output:

 [cpu_1];[fw4_0];fw_log_drop_conn: Packet <dir 1, 192.168.200.100:0 -> 172.32.200.100:0 IPP 50>, dropped by do_inbound, Reason: decryption failed

Well this still isn’t saying too much, but at least is giving a hint. Next lets take a look at the secure XL debug, maybe it gives some more info. To get the output prepare the debug first by using the following commands:

[Expert@HostName:0]# fw ctl debug 0
[Expert@HostName:0]# fw ctl debug -buf 32000
[Expert@HostName:0]# sim dbg -m vpn all
[Expert@HostName:0]# sim dbg -m mgr + vpn
Now start the debug:
fw ctl kdebug -T -f > /tmp/debug.txt

Let it run for a bit and close it with ctrl+c. Go through the log file, you might find something like this:

;11Jul2017 13:14:57.017362;[cpu_1];[SIM-xxxx]vpn_ipsec_decrypt: Packet does not match block size (xx xx xx);

;11Jul2017 13:14:57.017362;[cpu_1];[SIM-xxxx]vpn_decrypt: IPSEC decryption failed;

Well this is odd. You contact the peer gateway’s technical contact asking if have they changed anything lately and find out that they changed their firewalls..

Fixing the issue

To remedy the issue create a new gateway object that is of the “Interoperable Device” type and has all the same settings/parameters as the previous the peer gateway object that was with the “Check Point gateway” type. Change the peer GW object in the VPN community to the newly created “Interoperable device” and install policy. And the traffic starts flowing again.

As it seems Check Point is handling VPN tunnels differently between Check Point devices and Interoperable devices.

Using KeePass and KeeAgent on MacOS to handle SSH keys

This is the second a follow up post to the issue described in my previous post describing the issue with SSH keys being re-usable by anyone with privileged access on the SSH server. (Read more) This time the post is about a workaround to the issue on MacOS and in other words how to get KeePass and KeeAgent working on MacOS. Unfortunately KeePassX/KeePassXC the ports of KeePass that have MacOS native variants do not support plugins. So in order to get the KeeAgent plugin working, we need to run the Windows KeePass application using Mono.

Pre-requisites

  • Mono installed on your Mac. (Can be found at http://www.mono-project.com/download/)
  • A SSH private key in Putty format(.ppk) and the public key set on the SSH server authorized keys file.

Getting Ready

As mentioned previously we will be using the password manager called KeePass and it’s plugin called KeeAgent to store and present the SSH private key to putty. So lets get started.

  1. KeePass can be found at  https://keepass.info/ you need to download the portable version 2.xx (current version is 2.38) and unzip it.
  2. Install KeeAgent plugin which can be found at https://lechnology.com/software/keeagent/. Download it and unzip the file called KeeAgent.plgx to KeePass plugins directory – folder called plugins in the folder you unzipped.

Making KeePass run almost like a native app

To make KeePass a bit more comfortable to use, lets make it feel more like a native App. In order to do that do the following:

  • Make the App directory, by opening the terminal and inserting the following command:
mkdir -p/Applications/KeePass.app/Contents/MacOS
  • Move everything in the previously unzipped KeePass folder to /Applications/KeePass.app/Contents/MacOS
mv ~/Download/KeePass-2.38/* /Applications/KeePass.app/Contents/MacOS/
  • Create a shell script named KeePass in the same directory that will start up KeePass:
  • tee -a /Applications/KeePass.app/Contents/MacOS/KeePass << END
    #!/usr/bin/env bash
    /usr/local/bin/mono /Applications/KeePass.app/Contents/MacOS/KeePass.exe &
    END
  • Almost done, now you can start KeePass with a click of a button, but it isn’t ready yet to be used as a SSH key agent.

Getting the SSH key agent functionality working

Getting KeePass to work as an SSH key agent is a bit tricky, but nothing overwhelming. In order to do it you need to edit a few configuration files and add a script that would ask for confirmation. To achieve this it is necessary to disable System Integrity Protection(SIP) temporarily.

So as the first thing disable SIP temporarily by following the guidelines that can be found at https://www.imore.com/el-capitan-system-integrity-protection-helps-keep-malware-away.

After you log back in with SIP disabled you now should be able to add the ssh-ask-pass script to your system. To do that add the following text in to copy/paste the following text in to a file using your favourite text editor and save it on to your desktop to a file called ssh-askpass:

#!/bin/bash

# Script: ssh-askpass

# Author: Mark Carver# Created: 2011-09-14

# Licensed under GPL 3.0

# A ssh-askpass command for Mac OS X

# Based from author: Joseph Mocker, Sun Microsystems

# http://blogs.oracle.com/mock/entry/and_now_chicken_of_the 

# To use this script:

#   Install this script running INSTALL as root

# If you plan on manually installing this script, please note that you will have

# to set the following variable for SSH to recognize where the script is located:

#   export SSH_ASKPASS="/path/to/ssh-askpass" 

TITLE="${SSH_ASKPASS_TITLE:-SSH}";

TEXT="$(whoami)'s password:";

IFS=$(printf "\n");

CODE=("on GetCurrentApp()");

CODE=(${CODE[*]} "tell application \"System Events\" to get short name of first process whose frontmost is true");

CODE=(${CODE[*]} "end GetCurrentApp");

CODE=(${CODE[*]} "tell application GetCurrentApp()");

CODE=(${CODE[*]} "activate");

CODE=(${CODE[*]} "display dialog \"${@:-$TEXT}\" default answer \"\" with title \"${TITLE}\" with icon caution with hidden answer");

CODE=(${CODE[*]} "text returned of result");

CODE=(${CODE[*]} "end tell");

SCRIPT="/usr/bin/osascript"

for LINE in ${CODE[*]}; do

    SCRIPT="${SCRIPT} -e $(printf "%q" "${LINE}")";

done;

eval "${SCRIPT}";

After saving the script move it to/usr/X11R6/bin/ssh-askpass and set its permissions. The target folder usually doesn’t exist by default and you need to create it. To achieve the aforementioned tasks do the following in the terminal:

sudo mdkir -p /usr/X11R6/bin/
sudo mv ~/Desktop/ssh-askpass /usr/X11R6/bin/ssh-askpass
sudo chown -R root:wheel /usr/X11R6
chmod a+rx /usr/X11R6/bin/ssh-askpass

Now you can re-enable SIP.

Starting KeePass for the first time

Now you can test it out by starting KeepAss, be aware that the first time loading KeePass in mono can be really slow. Next follow the same steps as were in Windows , they can be found in the KeePass Windows article here.
Now if you have your KeePass ready for use try it out in terminal by connecting to your desired host via ssh by simply issuing the “ssh username@host” command.

Trunk between Cisco Catalyst switches and HP Aruba 5400zl R2

When creating a trunk link between a Cisco Catalyst switch and a HP 5400zl R2 switch, it would be a good idea to have it work in LACP mode.  It is quite simple, you just create the bond on both switches and add the VLAN’s you want on to the trunk link. And here is a little configuration example to show how it goes.

On the HP 5400 side just use the following commands:

trunk A24,B24 trk1 lacp
vlan 10 tagged trk1
vlan 20 tagged trk1
vlan 4000 untagged trk1

On the Cisco Catalyst side it requires a few more commands, but isn’t difficult either. Just add interfaces to a channel group and add the VLAN’s on to the channel group, by doing the following:

interface range GigabitEthernet1/0/24,GigabitEthernet2/0/24
switchport mode trunk
channel-protocol lacp
channel-group 1 mode active
interface Port-channel1
switchport trunk native vlan 4000
switchport trunk allowed vlan 10,20
switchport mode trun

User permissions issue on migration from MySQL to MariaDB

Today I decided to migrate the website from my old home server that had MySQL installed to a newer web server with MariaDB running on it.

Did it by doing the regular mysqldump and import procedure, which all went fine up to the point when I actually tried to access the site again. Then I got the following error message “Error establishing a database connection“. To see what’s going on I tried logging in to the database using the websites credentials in commandline and it also failed. After that logged in as root and saw that the user was imported, but it had no permissions.

To check what users exist in the database You can use the following SQL statement:

SELECT User, Host, Password FROM mysql.user;

To see what privileges a user has you can use the following SQL statement:

show grants for 'user_name'@'localhost';

In my case it showed the following out put stating that that the user has no privileges:

ERROR 1141 (42000): There is no such grant defined for user 'user_name' on host '%'

After seeing that I tried just re-applying the users rights by using the regular grant command to re-grant the user it’s privileges on the database using the following command:

MariaDB [(none)]> GRANT ALL PRIVILEGES ON database_name.* to 'user_name'@'localhost' WITH GRANT OPTION;
Query OK, 0 rows affected (0.00 sec)

Then I looked at the users permissions again and unfortunately I got the same result as before, “no such grant defined for the user..”.  After that I tried just flushing privileges, to force the server to reload them by issuing the following command:

FLUSH PRIVILEGES;
Query OK, 0 rows affected (0.00 sec)

It didn’t get any better. Finally ended up revoking, flushing and resetting the permissions by doing the following:

MariaDB [(none)]> REVOKE ALL PRIVILEGES, GRANT OPTION FROM 'user_name'@'localhost';
Query OK, 0 rows affected (0.00 sec)

MariaDB [(none)]> FLUSH PRIVILEGES;
Query OK, 0 rows affected (0.00 sec)

MariaDB [(none)]> GRANT ALL ON database_name.* TO 'user_name'@'localhost';
Query OK, 0 rows affected (0.00 sec)

MariaDB [(none)]> FLUSH PRIVILEGES;
Query OK, 0 rows affected (0.00 sec)

MariaDB [(none)]> show grants for 'user_name'@'localhost';
+--------------------------------------------------------------------------------------------------------------------+
| Grants for user_name@localhost |
+--------------------------------------------------------------------------------------------------------------------+
| GRANT USAGE ON *.* TO 'user_name'@'localhost' IDENTIFIED BY PASSWORD '*xxxxxxxxxxxxx' |
| GRANT ALL PRIVILEGES ON `database_name`.* TO 'user_name'@'localhost' |
+--------------------------------------------------------------------------------------------------------------------+
2 rows in set (0.00 sec)

That finally helped and the site is up on the new server.
802.1x Authentication on Cisco Catalyst switches

If any one is wondering how to configure 802.1x authentication on Cisco switches, here is a little list of commands that should help you. I am not going to cover the hassle of configuring NPS service on Windows domain server at the moment, but maybe later on if I get the time for it.

Basics of what you need to do

  1. Configure the radius servers on the switch
  2. Set the switches authentication mode to aaa new-model and configure aaa authentication it self
  3. Configure the VLANS you want to use (not going to cover creating a VLAN here..)
  4. Configure the ports you want the authentication to be required on

The configuration

So lets start configuring the switch (using the command line interface). First log in to the switch a. (I seriously hope you are using SSH not telnet..)

Configuring the radius servers

You should replace the IP addresses ports and passwords to match the ones you are going to use. PS password will be in plain text in the configuration unless you have service password encryption turned on. I am configuring the switch to use 2 radius servers, since its always a good idea to have more than one of them.. In case one fails the switch will try the other one to authenticate the user.

radius server name-of-first-server
 address ipv4 10.0.0.101 auth-port 1812 acct-port 1813  
 key  YourRadiusPasswordHere

radius server name-of-second-server
 address ipv4 10.0.0.102 auth-port 1812 acct-port 1813
 key  YourRadiusPasswordHere
aaa new-model 
aaa group server radius MyRadiusServers
 server name name-of-first-server
 server name name-of-second-server

Enabling authentication

Set the user authentication service to use your previously configured radius group radius servers

aaa authentication dot1x default group MyRadiusServers
aaa authorization network default group MyRadiusServers

Enabling user authentication on the ports

After configuring the radius part on the switch it’s time to enable authentication on the ports you want. As an example I enabled them on ports 1-12 leaving the others alone.

interface range gi1/0/1-12
switchport access vlan 5
switchport mode access
authentication event fail action authorize vlan 2
authentication event no-response action authorize vlan 2
authentication port-control auto
dot1x pae authenticator
dot1x timeout tx-period 2

The “switchport access vlan” command sets the VLAN that the user will be put in to incase of a successful authentication, in the case of this example it’s vlan 500.  In other words, it sets the ports default vlan.
The commands starting with “authentication event” set the VLAN where the user ends up in case of authentication failure.
Dot1x timeout it’s not a mandatory command, but a nice thing to set if you want to use authentication fail to send people to some guest network. The thing what I noticed was that the clients that don’t authenticate them selves some times ended up with the auto configure addresses – windows just gave up on trying to get access to the network, when this time out was not set.

Safer SSH key usage on Windows than just using Putty pageant

This is the first a follow up post describing a work around on Windows to the issue described in my previous post describing the issue with SSH keys being re-usable by anyone with privileged access on the SSH server. (Read more). Basically the workaround is to use KeePass and it’s plugin called KeeAgent instead of using putty’s pageant to present the SSH key to Putty.

Pre-requisites

  • Putty installed on your computer
  • A SSH private key in Putty format(.ppk) and the public key set on the SSH server authorized keys file.

Getting Ready

As mentioned previously we will be using the password manager called KeePass and it’s plugin called KeeAgent to store and present the SSH private key to putty. So lets get started.

  1. KeePass can be found at  https://keepass.info/ you need to download version 2.xx (current version is 2.38) and install it.
  2. Install KeeAgent plugin which can be found at https://lechnology.com/software/keeagent/, download it and unzip the file called KeeAgent.plgx to KeePass plugins dir (C:\Program Files (x86)\KeePass Password Safe 2\Plugins)
  3. Start KeePass

Using KeePass and KeeAgent for handling the SSH keys

  1. Create new password database and set the password you want.
  2. Add a new password entry to the password database to do that in the menu go to “Edit -> Add New Entry” or just press the new entry button.
  3. Whilst creating the new password entry set the password in the entry to be the same as it is on your .ppk file
  4. Go to the Advanced tab and in the Attachments section attach your .ppk file
  5. Go to the KeeAgent tab, tick the box allowing KeeAgent to use this entry. After that tick the box “use confirm constraint”.  Set the private key location to attachment and select the previously attached file. If the password has been set correctly and the attachment is a valid .ppk file it should show public key info below.
  6. Next navigate in the menu to Tools -> KeeAgent and click on it. In the window that opened click on “Add..” , select “From KeePass..” and select the previously imported key. Verify that the require confirmation box is ticked and click ok.
  7. Now open up Putty and try connecting to some SSH server where your key should work.

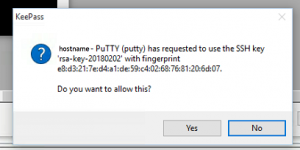
If all is working as it is supposed to the following prompt should pop up asking for permission on the private key usage every time it is being accessed by a new session:

KeeAgent-Prompt

The prompt will show the hostname where the key is being accessed and the key description (name and fingerprint).

R77 database revision control unspecified error

It is always a good idea to have database revision control on just in case. But keep in mind that the comment field in it doesn’t support all sorts of characters. As it turns out using commas (“,”) inside comments are illegal and ends up with the revision creation failing and SmartDashboard client giving you an “unspecified error” message. Just remove the comma or any other “strange symbol” from it and it works fine. In other words remember to keep the comments short and simple, with out special characters..